FaraWay: Dynamic Way Point Trails

Hi there,

it has been awhile! I won’t bore you with the details, but INK has been doing far better than expected! Thank you to everyone who has shared, supported, and purchased INK. It has been an absolute blessing!

During my INK development cycle, Sandy Gordon and Fellipe Martins have been working hard on the first project to be produced by our new studio, Spaceboy Games.

We will reveal more about the project soon, but for now, you can find information about it using the hashtag, #FaraWay.
Continue reading “FaraWay: Dynamic Way Point Trails”

FaraWay: Dynamic Way Point Trails

Effects: Blood Splatter

Hi, all.

First, I’d like to apologize for slowing down these tutorial series. Things have been a little rough since my largest contract project fell through. For the most part, I’ve been scrambling to jump on something else. Sending out prototypes, replying to job offer emails, etc. No big decisions have been made, but I’m still hopeful.

Anyway, I’ve been told time and time again to do a series on all of my little ‘juice’ effects. Dust when you land from high jumps, screen shake, smoke from bullet fire, etc, etc. I’m going to start that today!

However, I’m going to start with one that’s new to me. Mostly because it’s the most interesting to me, currently. That way you’ll get to see my thought process as I piece these things together.

Blood Splatter

Recently I played through Hotline Miami 2, as I am sure that a lot of you did, as well. Each kill is accompanied with a fairly brutal blood splatter. I wanted to see if I could piece together a top-down dynamic blood splatter that achieves a similar effect.

Final Effect

Continue reading “Effects: Blood Splatter”

Effects: Blood Splatter

Pathfinding Pt.2

In part one, I gave a brief run down of the A* algorithm and how to implement for 2d, top-down pathfinding within a grid. I mentioned what a global solver is and how they differ from their counterpart, the local solver. Our A* algorithm will basically just provide us with our global solver. In a sense, it connects the dots, and our enemy AI will have differing local solvers that allow them to move between dots.

For part two, I am simply going to rework the way that we have our nodes setup so that they make more sense in a platformer context. The first thing that you’ll notice is that a platformer needs far less nodes. The enemies don’t need information for every single empty tile in the room. They just need markers that tell them when their paths are interrupted by pits, ladders, and other obstacles which may require them to do anything other than walk/run.

The graph is created by posting nodes at key locations across the map. Those locations are as follows:
-Ladder (top)
-Ladder (bottom)
-Platform (edge)
-Floor (jump launch point)
-Floor (jump land point)

We can add more variety later, if needed.

And honestly, that’s ALL we need to do. If the A* algorithm is still in place and we hand-stitch our list(s) of neighboring nodes together, everything should still work just fine. Here are a few examples.


Here you can see that an object needs to get from the top-left node to the node on the right side of a pit. In this case, the algorithm chose to move right along the platform and then jump down to the node below. We could change this by adjusting our heuristic. Perhaps the enemy is afraid of heights or takes fall damage. By adjusting our ‘H’ value, we could have that object decide to take the ladder down and hop across.


Again, the algorithm is pretty ballsy and is hopping across gaps and off of high platforms. This was intended, but could easily be changed if we didn’t like this maneuver. The simplest way to change this would be to remove that neighbor altogether. That way, the enemy wouldn’t even know that it could jump off of the platform. It would have to find a ladder.

Also note that on the second example the algorithm skips a node on the floor. This is because the neighbor to its left doesn’t need to know about it. It only needs to know how to jump down to the left or how to get to the ladder to its right. That skipped node only exists for jumping down from the far-right platform.

This is a super simple update, but it’s progress. We can now see where we’re headed. Next time we will adjust the heuristic so that objects can decide when to jump across pits versus when to use a ladder. Maybe we’ll balance urgency with risk of fall damage. Then onto the tough stuff: the local solver(s) and dynamically pairing neighbors.

Here is more of the top-left node searching for the node closest to the mouse cursor.

-Z

Pathfinding Pt.2

Pathfinding Pt.1

Before delving further into my procedural generation series, I’m taking a slight detour to talk about pathfinding. Pathfinding is typically used to simulate AI intelligence. In short, it creates a graph of all pathways through the current scene and calculates the shortest route from the current position to a target position (typically the player’s position).

My goal is quite complex. My goal is to create an easy-to-use, preferably automated, pathfinding system for 2D platformer/’metroidvania’ situations. When I was young, I absolutely loved a game called, Metroid Fusion. It was a typical Metroid game that followed the well-known formula. However, it introduced a new danger in the form of a Samus (the protagonist) clone, referred to as the SA-X.

The SA-X would show up during different segments of the game and was practically hunting the player. These portions of the game made me very anxious and had my palms sweating like Battle Toads on a bad day. The AI felt SO smart to my ten year old self who was too scared of the enemy to even think twice about trying to break the system. Apparently, the SA-X wasn’t actually so smart…

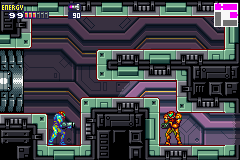
Here she runs back and forth as you stand on the other side of this morph-ball tunnel. Hilarious, but it’s something that I want to fix. I want to recreate this feeling that I had. The feeling that it doesn’t matter what you do. The enemy WILL find you.

I’ve broken down the problem into several steps (I may break it down further as I run into problems) and we will look at the first today.

STEP 1: The Global Solver

First we will take a look at the global solver. The global solver is our path. If you were to take a screenshot of a level and draw a line through the level, from enemy to player, that would be the job of the global solver. Later we will cover the local solver. The local solver tells the AI how to get from node to node (more on this later) along our path. For example, when to jump rather than look for a ladder. The local solver would have helped the SA-X use its morph ball ability rather than turn around and look for other options.

There are a few options for global solvers, but A* is most popular and probably the most well-documented. I’ll quickly talk about A* (pronounced A-Star) for those of you who haven’t worked with this algorithm before.

The A* Algorithm

The A* algorithm is a process for efficiently plotting a path between two points on a graph of nodes. Nodes are basically data structures used to plot data for a graph traversal problem. Pathfinding is commonly used in top-down games, like turn-based, tactics RPGs. Think the Fire Emblem series. In Fire Emblem, each grid square is represented by a node. The node has an (x, y) position as well as a list of pointers to its neighboring nodes. We use this list of neighbors to navigate from node to node within our algorithm.

In Game Maker, you may let your nodes be actual objects and initialize a room like this:

var obj;
for (var i = startx; i < endx; i += NODE_WIDTH) {
    for (var j = starty; j < endy; j += NODE_HEIGHT) {
        obj           = instance_create(i, j, oNode);
        obj.passable  = true;
        obj.F         =  0; // F-Cost = (G + H)
        obj.G         =  0; 
        obj.H         =  0;
        obj.parent    = -1;
        obj.cost      =  1; // Cost of moving through node
        obj.neighbors = ds_list_create();
    }
}

If you have done any pathfinding work before, you have probably heard of depth first search (DFS) and breadth first search (BFS). If so, you will have probably asked yourself why you don't try to calculate the most appropriate node to move to next rather than blindly guess and exhausting all options (as you would with DFS). This is pretty much what A* is. It's actually a special case of Dijkstra's algorithm that uses projected costs to guess the correct combination of movements.

First, let's figure out the cost of moving from node to node.

F = G + H

As shown above, each node has an F-cost. That F-cost is found by combining a G-cost and an H-cost. But what are those? G is the cost that it took to get to the current node, while H is our guess of what it will cost to get to the target node from the current node. Basically, cost from start plus cost to finish. The H cost is known as our heuristic. The heuristic is not an algorithm, but an intuitive series of steps that allows us to guess and approximate solutions. If your H is solid, then A* will find the shortest path from A to B very quickly, if not then your performance just goes down from there. Hardly ever is your H going to be "perfect". In my case, H will take A LOT of tweaking because I will be weighing different maneuvers like running, jumping, wall jumping, climbing ladders, etc. That will come later.

The first step to implementing the A* algorithm is to create an open list and a closed list. During each iteration, we'll look at the neighbors of the current node, and add the one with the LOWEST F-cost to the open list. We will iterate through this and eventually add all of the "best picks" to our closed list. Honestly, this part is best described via pseudo-code or by watching a video demonstration.

Here, I'll Wikipedia that for you:

function A*(start,goal)
    // The set of nodes already evaluated.
    closedset := the empty set
    // The set of tentative nodes to be evaluated, initially containing the start node    
    openset := {start}    
    // The map of navigated nodes.
    came_from := the empty map    
 
    // Cost from start along best known path.
    g_score[start] := 0    
    // Estimated total cost from start to goal through y.
    f_score[start] := g_score[start] + heuristic_cost_estimate(start, goal)
 
    while openset is not empty
        current := the node in openset having the lowest f_score[] value
        if current = goal
            return reconstruct_path(came_from, goal)
 
        remove current from openset
        add current to closedset
        for each neighbor in neighbor_nodes(current)
            if neighbor in closedset
                continue
            tentative_g_score := g_score[current] + dist_between(current,neighbor)
 
            if neighbor not in openset or tentative_g_score < g_score[neighbor] 
                came_from[neighbor] := current
                g_score[neighbor] := tentative_g_score
                f_score[neighbor] := g_score[neighbor] + heuristic_cost_estimate(neighbor, goal)
                if neighbor not in openset
                    add neighbor to openset
 
    return failure
 
function reconstruct_path(came_from,current)
    total_path := [current]
    while current in came_from:
        current := came_from[current]
        total_path.append(current)
    return total_path

Again, in short (this is meant to be a study, not a tutorial), you start with the initial node and keep track of the nodes that need to be traversed in some form of priority queue or list. This is the open list. Nodes with a lower F-cost get a higher priority. During each iteration, the node with the highest priority is removed from the open list, the F-cost of its neighbors are updated and added to the open list. The algorithm continues until the goal node has the lowest F-cost in the list. That F-cost is basically the length of the shortest path. If done correctly, you will assign parent nodes along the shortest path and iterate backwards along them to find your path between nodes.

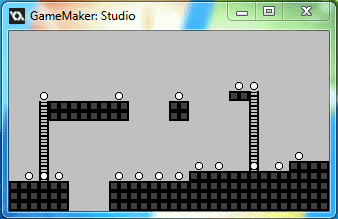
There are TONS of papers, examples, and studies on the A* algorithm. I don't necessarily want to go in depth, myself. However, this was the first step to accomplishing our platformer pathfinding. My plan is to use A* to find the shortest path between a set of way-points that we will setup later. In a platformer, every tile doesn't need to be a node. We only need nodes at specific landmarks like before a jump, the end(s) of platforms, or at the top and bottom of ladders. Our global solver will use A* to find the connections between these nodes. Later our local solver will tell our objects how to traverse the terrain between any pair of nodes.

Here is my A* algorithm running after my first night of work on this project. Here you can see the algorithm finding the path from (0, 0) to (mouse_x, mouse_y) in real time.

-Z

Pathfinding Pt.1

DevLog: Creating a Platformer Pt.6

Hello all,

it has been awhile. In this portion of the series, things are going to vastly change and I’d like to use this entry to talk about what that means and why.

Team

The game has been fully realized. It is no longer a box that hops around in an empty world. Characters have been developed with personality and motive. The world has become a tangible place. Lastly, a full development team is now involved.

As I get artists and others involved, the project becomes less of a linear, programming marathon. We are at work designing mechanics, enemies, puzzles, and overall game flow.

Reveal

Also, we are working towards a “first-playable” and our reveal trailer that will hopefully be paired with some form of press release. Due to this, I’m going to be LESS open about what’s happening. The reveal will answer any and all questions within the coming months.

What can I tell you?

Well, not much. Pixel art is out and HD, hand-painted art is in. We may even experiment with paint-overs of 3D models. Within the next few weeks we will be fleshing out the desired art style(s) and resolution. Soon after I will return to posting GIFs and small teasers as to what we’re focussing on.

Design

I will probably start a parallel series of articles that focus on the design of the game. I want to keep this one focussed on the programming aspects of the game because that’s what most of you have come here for previously.

More to come,

-Z

DevLog: Creating a Platformer Pt.6

#IndiesVSPewDiePie Jam

I am entering a game jam this weekend! It is the Indies VS PewDiePie jam, hosted by GameJolt (http://jams.gamejolt.io/indiesvspewdiepie). The jam started last night at midnight (EST) and will be ending on Sunday night (also midnight, EST).

The theme was basically just humor and games that are as fun to watch as they are to play. I came up with the idea of Acrobatic Bull In A China Shop. The game is about guiding a tiny bull through a series of shops and smashing pots and dishes within a given time limit.
Continue reading “#IndiesVSPewDiePie Jam”

#IndiesVSPewDiePie Jam

Action-Platformer Engine #1

I’ve decided to break up the engine a bit. The feature list was getting pretty huge and I really want the engine(s) to be affordable. To avoid charging a crazy premium, I thought that I’d just be discrete about the contents of each pack and separate them into segments that can be less expensive.

Anyway, the first installment will be an action-platformer with an emphasis on a complex player object. I want to find a balance between Castlevania, Volgarr, Zelda II, and maybe some Dark Souls influences.
Continue reading “Action-Platformer Engine #1”

Action-Platformer Engine #1

Advanced Platformer Engine Pt.1

I have mentioned the Game Maker Marketplace in other articles and have shown off a GIF or two from my Rope + Water Physics Platformer Engine.

Many of you have been suggesting that I just make a large “feature-complete” advanced engine that has all of the platformer bells and whistles that you could ask for. Tonight, I started working on that.

Here is my current to-do list. Feel free to suggest additions!
Continue reading “Advanced Platformer Engine Pt.1”

Advanced Platformer Engine Pt.1