DAY 1
I would like to work on a project, publicly. I think it would be cool to show off what goes through my mind as I am both programming and designing the “feel” and mechanics that go into a fast-paced, action platformer.
As usual, I am going to be using Game Maker Studio for this project. When creating a new project file, my first steps are to get some placeholder art into the build, asap. I want to be able to test code as it is completed so I quickly make a standard 16×16 pixel block, two 45-degree angle slopes, and a bounding box for the player.
oGame
My first object is always called, ‘oGame’. This will be the main controller object and will be used for some simple debug/test room traversal. I want to be able to exit the game with the escape key, restart the current room, and shift through the levels, both forward and backward.
// Input variables for debug room traversal
var kRestart, kExit, kPrev, kNext;

kRestart = keyboard_check_pressed(ord('R'));
kExit    = keyboard_check_pressed(vk_escape);
kPrev    = keyboard_check_pressed(vk_subtract);
kNext    = keyboard_check_pressed(vk_add);

if (kRestart)
    room_restart();
if (kExit)
    game_end();

// Iterate through rooms backward
if (kPrev) {
    if (room == room_first)
        room_goto(room_last);
    else
        room_goto_previous();
}

// Iterate through rooms forwards
if (kNext) {
    if (room == room_last)
        room_goto(room_first);
    else
        room_goto_next();
}
Note: The code above was placed in the ‘step event’ of oGame. This means that the code will run every frame. This object will also be marked as ‘persistent’. This means that the object will only be created once and will remain active when moving between rooms.
We can also display the name of the room in the corner of the view port using the ‘draw gui event’. That would look like this:
// Display room name
draw_text(16, 16, string("Room: " + string(room_get_name(room))));
rmTemplate
I am also going to handle a few other things that will make further development easier. I make a new room called ‘rmTemplate’. This room will be set to the desired resolution (640×360 -> 16:9), it will have the view port info in place, and it will be set to the minimal room size (also, 640×360). Duplicate this room and call it ‘rmTest’. We will use this to test our initial gameplay.
Parents
I’ll quickly wrap up this portion by creating two parent objects: oParSolid and oParEntity. The first will be our collision objects. The second will be physics objects that collide with the collision objects. We can also create a few empty objects to get something on screen. I decided on oBlock, oSlope1R, oSlope1L, and oPlayer.
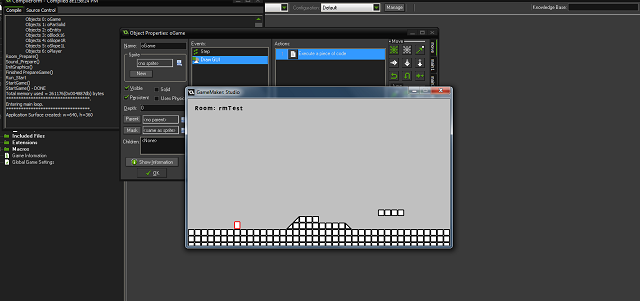
At this point we can see a few sprites on screen. Also, the room name is displayed in the corner of the view port and we can use the plus/minus keys to move between rmTest and rmTemplate.
-Z

Great read. Can’t wait for more!
LikeLike
As someone new to GameMaker, I’m eager to see more of this. Great start, keep it up!
LikeLike
As always another great entry! Keep it up mate!
LikeLike
Thanks for the support, guys 😀
LikeLike
Nicely composed DevBlog, Zack!
RT’d via the official Twitter channel.
LikeLike